
User manual for setting up the terminal.
Each terminal has its own unique URL page that you have access to from us. We will go through the individual settings that you can find in the left menu.
htmlhttps://your_areception.admin.areception.com/
Top Right Menu

Contacts
Setting up contact information.
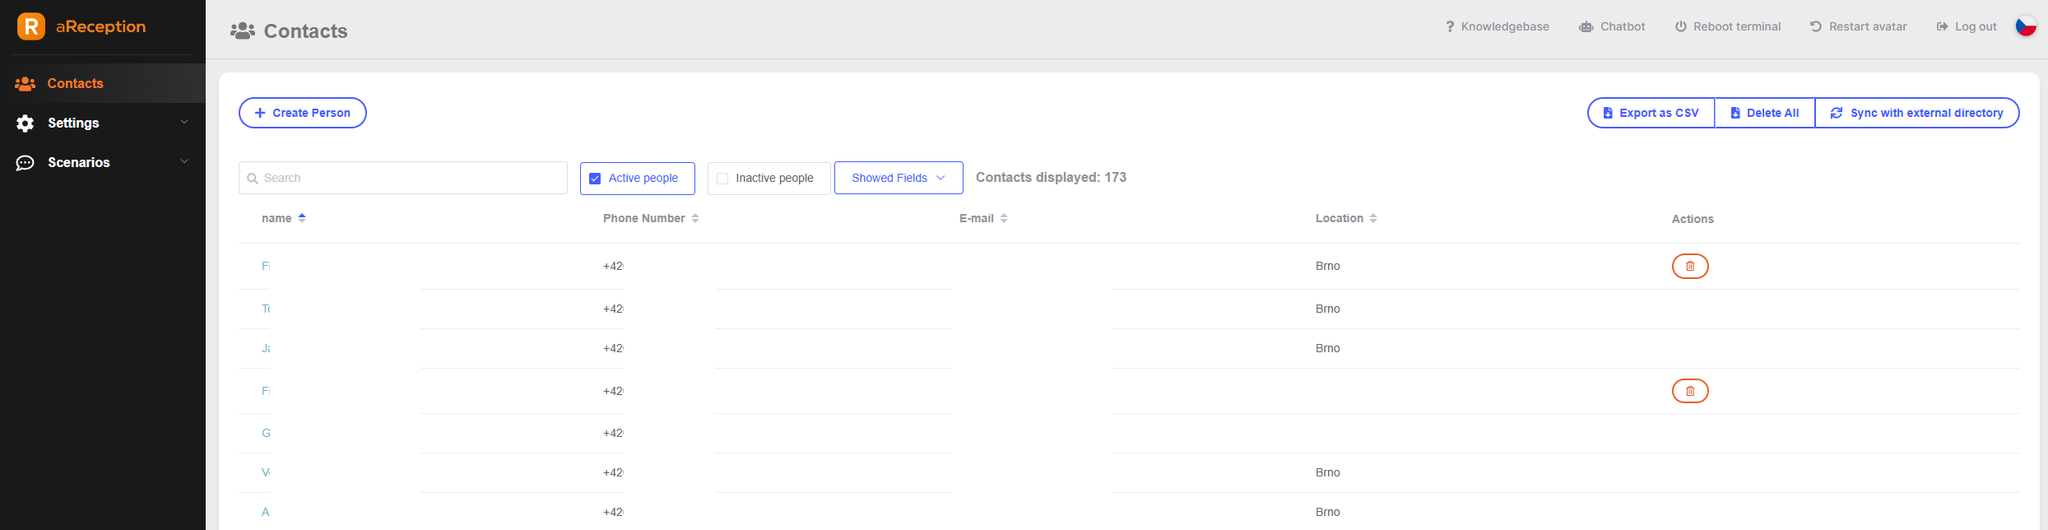
You can Create Person, Upload from CSV and Export to CSV.
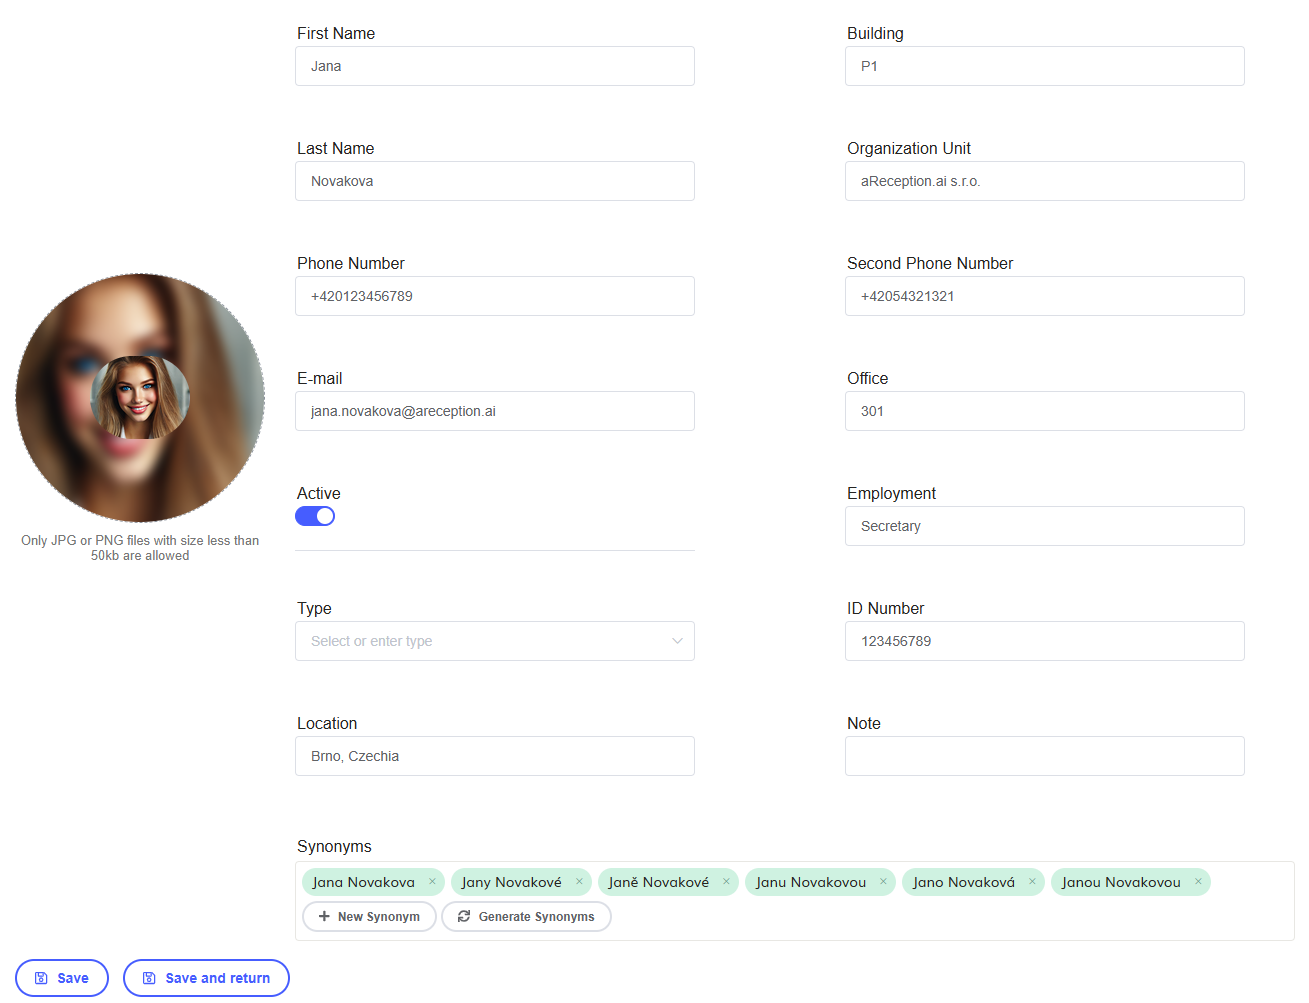
Create Person alias inserting a new contact into the database - name, surname, location, phone number, email. Let synonyms be generated and save.
Conversation Scenarios
Common Conversation
Here are the predefined texts and actions that the digital avatar should perform when someone starts communicating with the terminal.
- welcome_text: Text that appears when a visitor arrives at the terminal and starts communicating.
- goodbye_text: The text with which the avatar says goodbye at the end of the interaction.
- invalid_number: Alert that appears when a valid phone number is not stored in the contacts.
- choices: This section defines various options that the avatar can offer to the visitor.
- options: Offer of options that the avatar can perform.
- repeat_options: Repeating options in case the visitor does not choose any option.
- nothing_chosen: Avatar's reaction if the visitor does not select any option.
- pressed: Defines what happens when a specific key is pressed. For example, '1' represents a scenario when the "1" key is pressed.
- Start editing welcome_text according to the needs of your organization.
- Set goodbye_text to match the tone of your company.
- In the choices section, adjust the options and their responses to best meet the needs of your organization.
After completing the modifications, save the settings and verify their functionality by performing several test calls with the terminal.
Meeting
In this subsection, you can customize the avatar's reactions when a visitor comes for a meeting.
- welcome_text: The text that will be displayed to the visitor when they stand in front of the terminal for a meeting.
- goodbye_text: The text with which the avatar will bid farewell to the visitor after the interaction is over.
- invalid_number: Warning message that will be displayed if the contact number is invalid.
- choices: This section defines different options that the avatar can offer to the visitor.
- options: Offer of options that the avatar can perform if someone comes for a meeting.
- repeat_options: Repeating options if the visitor does not select any of them.
- nothing_chosen: The avatar's reaction if the visitor does not select any of the options.
- pressed: Establishes actions that will happen when a specific key is pressed. For example, '1' represents a scenario if the "1" key is pressed.
- Modify the welcome_text to fit the situation when a visitor comes for a meeting.
- Set goodbye_text according to your preferences.
- In the choices section, modify the options and reactions to correspond to how you would like to respond to visitors coming for a meeting.
After completing the modifications, don't forget to verify the functionality of the settings by performing several test calls with the terminal.
Post Office
In this subsection, you can set the reactions of the avatar in a situation where a messenger comes to you with a package that requires your signature.
- welcome_text: Text that will be displayed when the messenger brings a package to you and needs your signature.
- goodbye_text: Text with which the avatar will say goodbye to the messenger after the interaction is over.
- invalid_number: Warning that appears when your valid phone number is not stored in the contacts.
- choices: This section defines various options that the avatar can offer to the messenger.
- options: A list of options that the avatar can perform if the messenger brings a package to you.
- repeat_options: Repeats options if the messenger does not choose any of them.
- nothing_chosen: The avatar's reaction if the messenger does not choose any of the options.
- pressed: Specifies the actions that will be taken in response to pressing a specific key.
- Adjust welcome_text to fit the situation when the messenger brings a package to you.
- Set goodbye_text according to your preferences.
- In the choices section, adjust the options and reactions to respond to the arrival of the messenger with a package.
Remember to verify the functionality of the settings by performing several test calls with the terminal.
Interview
In this subsection, you can customize the avatar's responses for the situation when a candidate is waiting at the reception for the interview.
- welcome_text: The text that appears when the candidate arrives for the interview and waits at the reception.
- goodbye_text: The text with which the avatar will bid farewell to the candidate after the interaction is over.
- invalid_number: The warning that appears if your valid phone number is not saved in the contacts.
- choices: This section defines various options that the avatar can offer to the candidate.
- options: The list of options that the avatar can perform if the candidate is waiting at the reception.
- repeat_options: The repetition of options if the candidate does not choose any of them.
- nothing_chosen: The avatar's response if the candidate does not choose any of the options.
- pressed: It specifies the actions that will be taken in response to pressing a specific key.
- Customize welcome_text to fit the situation when a candidate is waiting at the reception for the interview.
- Set goodbye_text according to your preferences.
- In the choices section, customize the options and responses to correspond to how you want to respond to the candidate's arrival for the interview.
Once you have your settings ready, verify their functionality by performing several test calls with the terminal.
Sequential Calling
In this subsection, you can set up sequential calling to different people if you can't reach the first person called.
- people2call: This is a list of people that the avatar will call sequentially if it can't reach the first person called. The avatar starts by calling the first person on the list and continues until it reaches the end of the list or successfully reaches someone.
- last_person_redefine: If the avatar can't reach the last person on the
people2calllist, this section modifies the messages that will be displayed.
- welcome_text: The text that will be displayed when the host is waiting at the reception.
- goodbye_text: The message that the avatar will use to say goodbye to the host after the interaction is over.
- invalid_number: The warning that will be displayed if the called person's contact does not have a valid phone number.
- choices: This section defines the different options that the avatar can offer the person being called.
- options: The list of options that the avatar can take if the host is waiting at the reception.
- repeat_options: The repetition of options if the called person does not select any of them.
- nothing_chosen: The avatar's reaction if the called person does not select any of the options.
- pressed: Specifies the actions to be taken in response to the pressed key by the called person.
- Specify the
people2calllist by adding specific names of people you want to call sequentially.
- Set the expressions in the
last_person_redefinesection if you need to adapt them to the situation when you cannot reach the last person on the list.
- Specify
welcome_text,goodbye_textandchoicesaccording to your preferences.
After completing these steps, your avatar will be able to call different people sequentially until it reaches the end of the list or successfully reaches someone.
Basic settings
Starting the conversation
In this section, you can set under what conditions your digital avatar will activate and start communicating.
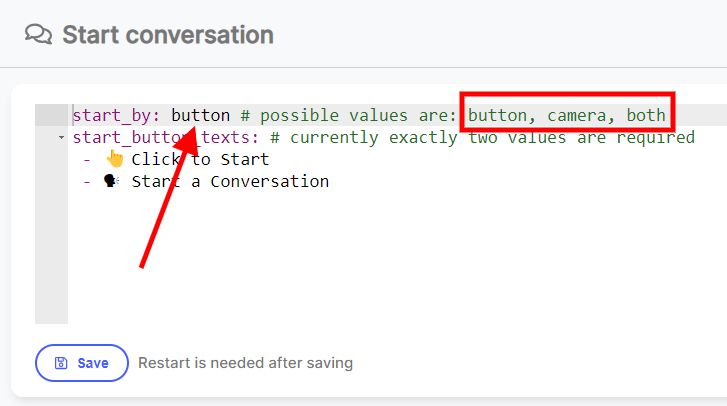
Parameters:
- start_by: This parameter determines how your avatar is activated and begins communicating.
- button: The avatar is activated by pressing a button on a touch screen. This is ideal for situations where you do not want the avatar to respond to everyone passing by, but only to those who show interest in interaction.
- camera: The avatar is activated automatically when the camera detects a person nearby. This may be suitable for situations where you want the avatar to greet visitors as soon as they appear in its field of view.
- both: This setting combines both of the above methods. The avatar can be activated either by pressing a button or by automatically detecting a person with the camera.
How to set up:
To set up the activation method of your avatar, change the value of the
start_by parameter according to your needs. Example:If you want your avatar to be activated only by pressing a button, set:
yamlstart_by: button # possible values are: button, camera, both
If you prefer the avatar to be activated automatically by the camera, set:
yamlstart_by: camera # possible values are: button, camera, both
And if you want both options, set:
yamlstart_by: both # possible values are: button, camera, both
Once you make this change, your avatar will respond according to the selected configuration.
STT Phrases
This section allows you to modify the behavior of your avatar's speech recognition. You can increase the probability of recognizing certain phrases or decrease the probability of recognizing words that you do not want the avatar to recognize.
Parameters:
- speech_contexts: This is a list of contexts that you can define for your speech recognition.
- name: The name of the context.
- phrases: A list of phrases that you want to prioritize or suppress.
- boost: A value that determines whether you want to increase or decrease the probability of recognizing certain words. Positive values increase the probability of recognizing words, while negative values decrease it.
How to Set:
Add your own keywords or phrases to the
phrases list for the given context. Then set boost to adjust the probability of recognizing these words.Example:
To increase the probability of recognizing names such as "Florence", "Flora", etc., create a context named
general_keywords, add these words to phrases and set boost to a positive value, e.g. 20:yaml- name: general_keywords phrases: ['Florence', 'Flora', ...] boost: 20
To decrease the probability of recognizing words such as "poor" and "mistress", create a context named
undesirable_words, add these words and set boost to a negative value, e.g. -20:yaml- name: undesirable_words phrases: ['poor', 'mistress', ...] boost: -20
Customize this setting according to your needs to help your avatar better understand your customers and respond better to their inquiries.
Basic Phrases
In this section, you set up basic phrases that your digital avatar uses when interacting with the user.
Parameters:
- welcome_greeting: Welcome message that the avatar says when first contacting the user.
- goodbye_message: Avatar's goodbye message to the user.
- welcome_questions: Questions that the avatar can ask the user immediately after greeting. The avatar can alternate questions or ask based on specific context.
- default_fallback_questions: Standard questions that the avatar can ask if it doesn't understand what the user is saying or what they want.
- transition_to_idle_messages: Messages that the avatar can say when transitioning from one state to another or when waiting for further instructions.
- restart_messages: Messages that the avatar can say if it needs to resolve a technical problem or restart.
- end_call_message: Avatar's message when ending a call.
- user_ended_videoconference_message: Avatar's message in case the user ended the video conference.
- low_transcription_confidence_state: Settings for situations when the avatar has low confidence in the transcription of the user's voice. The confidence threshold is defined, and various messages that the avatar can say if it doesn't understand the user.
How to set up:
For each parameter, you can customize the messages for each language (in this case, Czech and English) according to your needs. For example:
yamlwelcome_greeting:
  cs-CZ: Dobrý den
  en-US: Hello
Here the avatar greets a Czech user with "Dobrý den" and an English user with "Hello".
Similarly, you can adjust all other messages and settings to suit your digital avatar's needs and your customers.
Receptionist Personality
In this section, you define the personality and basic information that your digital avatar shares with the user during the first contact or when asked to introduce itself.
Parameters:
- cs-CZ and en-US: Text information in Czech and English that describes in detail who the digital avatar is, where it is located, and what its main purpose is. The text also provides basic information about the hospital and services in the vicinity.
How to set up:
For each language, in this case Czech and English, you provide the full text that your digital avatar will communicate to the user. For example:
yamlcs-CZ: I am a digital intelligent guide at the Children's Hospital in Brno, located on Černopolní Street No. 9, and my name is Florence.
en-US: I am a digital intelligent guide at the Children's Hospital in Brno, located on Černopolní Street No. 9, and my name is Florence.
This setting allows your avatar to introduce itself and provide the user with basic information that they might need when visiting the hospital or interacting with your digital avatar.
Other scenarios
Mail - Email
This scenario is used to notify users via email that a package has been left for them at the reception. If there are multiple people with the same name in the system, the email also informs which email addresses the notification was sent to.
SOS Contacts
If your digital avatar encounters a situation that it cannot solve on its own, or if you need to connect a user with a real person, you can use the SOS contacts feature. This setting defines how this feature will look and behave.
1. Language variants
Sets how messages will be displayed to users in different languages.
- language_variants: Contains all language variants you want to use.
- For example:
yamllanguage_variants:
  cs-CZ:
    title: Omlouvám se
    text: Bohužel se mi nepodařilo s nikým spojit. Zavolejte prosím mým kolegům na uvedená telefonní čísla. Děkuji a přeji hezký den.
    continue_button_label: Pokračovat
  en-US:
    title: I am sorry
    text: Unfortunately, I could not reach anyone. Please try to use phone numbers of my colleagues provided below. Thank you and have a nice day.
    continue_button_label: Continue
2. Continue button
Defines whether a continue button will be displayed after showing the message.
- show_continue_button: If set to "true", the continue button will be displayed. If "false", the button will not be displayed.
- For example:
yamlshow_continue_button: true
3. Contact persons
A list of real people that the user can contact. Each contact person contains a first name, last name, phone number, and picture (in base64 format).
- contact_persons: This field contains details of each contact person.
- For example:
yamlcontact_persons:
  - first_name: Jan
    last_name: Novák
    phone_number: +420123456789
    picture: PICTURE IN BASE64 FORMAT
  - first_name: Anna
    last_name: Dvořáková
    phone_number: +420987654321
    picture: PICTURE IN BASE64 FORMAT
By using the SOS contacts feature, you can provide users with an additional layer of support in case the avatar cannot solve a specific situation or if you need to connect a user with a real person. Make sure you have up-to-date contacts and regularly verify their availability.
Insert images in BASE64 format. You can generate it, for example, on this page: https://www.base64-image.de/
SOS Menu
If your users need quick help or instructions on how to communicate with the avatar, you can use the SOS menu feature. This menu will offer them basic instructions and the option to choose additional actions.
1. Language variants
Sets how messages will be displayed to users in different languages.
- language_variants: Contains all language variants you want to use.
- For example:
yamllanguage_variants:
  cs-CZ:
    title: Help
    text: Hello, I am virtual receptionist. You can communicate with me using your voice or buttons. I can also call you anyone from the company or connect you with back office. I am still on probation, so please be patient, speak loud and clear. Thank you and have a nice day.
    continue_button_label: Continue
    call_reception_button_label: Call reception
  en-US:
    title: Help
    text: Hello, I am virtual receptionist. You can communicate with me using your voice or buttons. I can also call you anyone from the company or connect you with back office. I am still on probation, so please be patient, speak loud and clear. Thank you and have a nice day.
    continue_button_label: Continue
    call_reception_button_label: Call reception
2. Continue interaction
Defines the button that allows the user to continue interacting with the avatar after displaying the help.
- continue_button_label: The label of the button that will be displayed to the user and allows them to continue interacting with the avatar.
3. Call reception
Defines the button that allows the user to quickly call reception.
- call_reception_button_label: The label of the button that will be displayed to the user and allows them to quickly call reception.
The SOS menu feature is a significant tool that helps users better understand the possibilities of interaction with your digital avatar. Make sure your instructions are clear and direct so that your users can effectively use all the options your avatar offers.
Paragraph
If aReception stops working correctly (for example, due to a loss of internet connection), an error message will be displayed on the terminal, which you define here.
Other Settings
Avatar
Some of you have a choice of multiple digital avatars that you can change (activate) as you wish. Afterwards, you must restart the terminal.
The List of Avatars:


Patience
Patience is a key element when interacting with our aReception device. To provide you with the best user experience possible, we have included several features that respond to your interest and attention.
1. "Loss of Focus" Feature (time_to_lose_focus):
Description: If the device detects that you are not focused on interaction for 18 seconds, aReception will automatically stop listening.
Practical Example: If you move away from the terminal, the device will recognize that you are not currently focused on interaction.
2. "Loss of Focus Alert" Feature (time_to_show_warning):
Description: After 10 seconds of your inactivity or absence, the device will issue a warning to let you know that you need to refocus on interaction.
Practical Example: If you get lost in thought for a moment, aReception will kindly remind you that it is ready to continue the communication.
3. "Question Repeat" Feature (time_to_repeat_question):
Description: Currently, this feature is set so that the device does not automatically repeat the last question, regardless of the amount of your inactivity. If this setting is changed in the future, the device will repeat questions after a certain amount of time if you do not respond to them.
Practical Example: If something distracts you and you forget to answer, the device can give you another chance to respond to the question.
4. "QR Code Reading" Feature (time_to_read_qrcode):
Description: When you scan a QR code, aReception will give you 30 seconds to complete the process.
Practical Example: If you have a QR code on a ticket or on your phone and you want to show it to the device, you have half a minute to scan it.
Bedtime Mode
Bedtime mode is a feature that allows you to program times when the terminal will automatically turn off and on again. This setting is ideal for situations where the location where the terminal is placed is closed outside of business hours, so there is no need for the terminal to remain in operation.
Functionality:
- Automatic Shutdown: Set the time when the terminal should be turned off. For example, if your facility is closed from 10:00 PM to 6:00 AM, you can program the terminal to shut down at 10:00 PM.
- Automatic Startup: Determine when the terminal will start functioning again. In our example, that would be at 6:00 AM.
Note:
If you want the terminal to function continuously regardless of the time of day, simply deactivate this feature.
Benefits:
- Energy Savings: When the terminal is not needed, you can save energy and extend the lifespan of the device.
- Less Annoyance: You eliminate unnecessary noise and light from the terminal when it is not needed.
Top right: Terminal Restart | Reception Restart | Logout | EN (language change)