
User manual for creating scenarios.
Intent
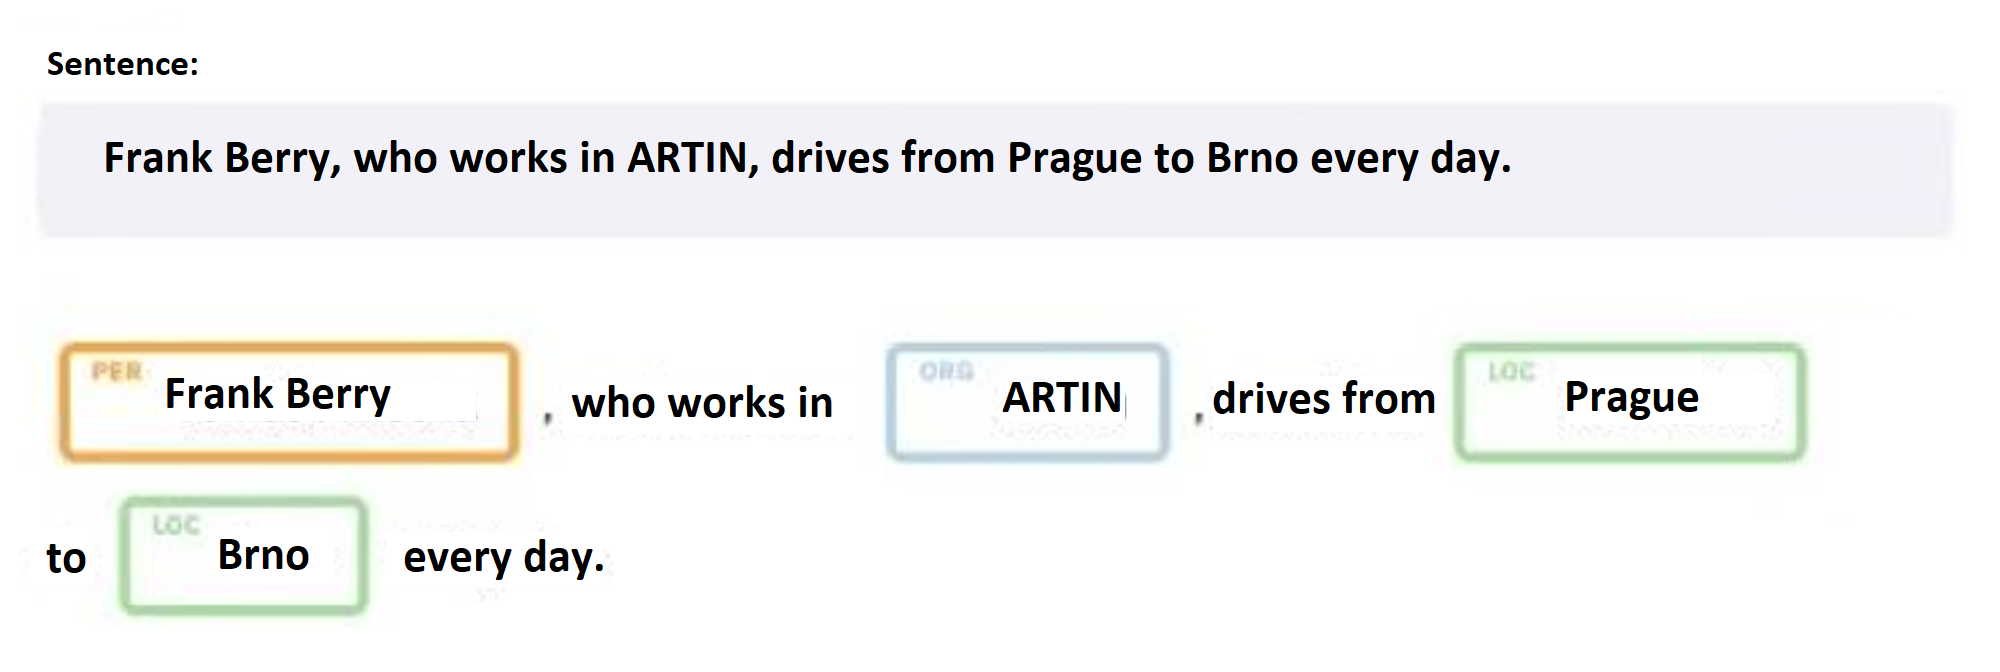
One of the key components of a chatbot is NLP (natural language processing). This part of artificial intelligence converts a user's text message into an intent - that is, it tries to understand what the user wants to express with their sentence. At the same time, it can also recognize certain entities in the sentence (names of people, city names, amounts, expressions of time, etc.) and thus define the semantics of the sentence.
If we want to define a new intent in a chatbot, the best way to do it is to provide artificial intelligence (NLP) with as many diverse examples as possible of how a person can ask or express themselves if they have a particular intention.
Example: Where can I park here? / Where is the parking lot? / Is parking free? / Where can I leave my car? / …
The intention of a chatbot in general is not contextual. This means that it should be able to derive meaning from the text without the need for prior knowledge of previous communication.
Example: If I provide information in one sentence: "I arrived today with a new car." and only then in another sentence (which is evaluated as a separate intent), I ask "Where can I leave it?" the chatbot will lack the context from the previous sentence when evaluating the intent of the second sentence, so it will not have any idea that I am talking about a car. Of course, it will be different if it is a sentence that is evaluated as a whole: "I arrived with a new car, where can I leave it?”
Scenario
The scenario is created by responding to a recognized intent in some way - this can either be by providing some information (a receptionist responds) or by making a phone call to a person or calling an elevator.
When creating scenarios, it is good to follow the following recommendations:
- Sentences for defining intent should only contain the important core message. It is good to remove all unnecessary content and baggage (such as greetings, addresses, etc.) that repeats across different intents.
- Responses should be rather short (up to 20 words), if they are longer, they can be divided into separate sentences. This will result in a faster response (converting a long text to speech takes longer) and keep the communicating user's attention better.
- If there is another action included in the response, the user should be verbally informed, e.g. "Hold on, I'm calling now."
- In the case of follow-up scenarios, it is important to remember that the scenario mechanism is not contextual. Therefore, additional questions should always be formulated as open-ended to deduce the appropriate intent from the possible answer. For example, when introducing a company, I will not ask "Do you want to know more?" because a possible answer yes/no requires context, but I would rather ask: "Can I tell you more about our services or projects, ask what interests you?"
- We recommend grouping scenarios into categories according to their general areas of interest (Company, Navigation, ...) to help with content maintenance.
- Try to write responses consistently to correspond to the desired personality of the receptionist and maintain their integrity. Typically, it is not appropriate to switch between formal and informal language or alternate between decent expressions and the latest slang of adolescents.
Tip: The KISS rule of simplicity also applies here. If I manage to convey as much information as possible in a form that does not rely on context, content creation and management will be simpler and faster.
Exercise: Create a simple informational scenario. Save it and test it first using the text interface of the chatbot and then by directly querying the virtual reception.
Conversion of text to speech and SSML
Unlike a classic chatbot, where the response is only in the form of written text, a virtual receptionist responds both in text and speech simultaneously. Therefore, it is necessary to fine-tune both these forms, with the spoken form being more complex.
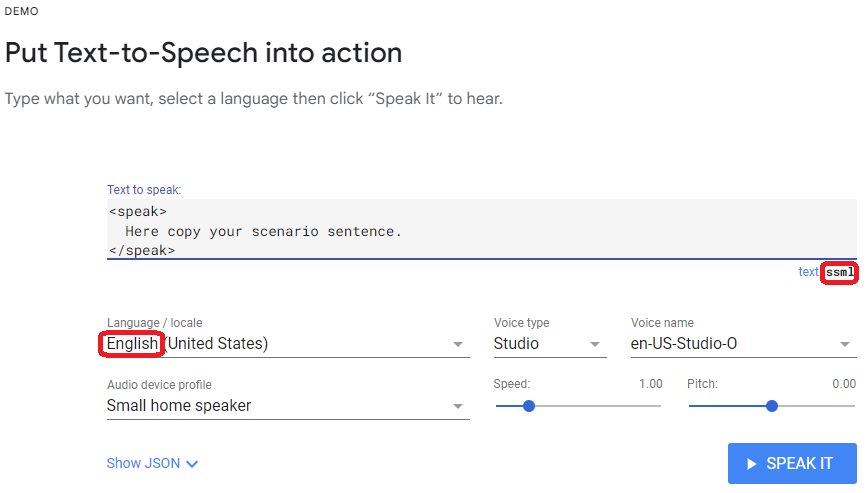
Text is entered into the chatbot interface in the SSML (Speech Synthesis Markup Language) format - a sentence is expanded with special tags that specify how the text should be pronounced. A detailed description of SSML can be found at this link: https://cloud.google.com/text-to-speech/docs/ssml
The following tags are the most practical and commonly used, and some of them are offered by the SSML editor in the chatbot interface:
- <break strength="weak"/> - a pause or a decrease in the voice with the indication of intensity - possible intensity values range from lowest to highest: "x-weak", "weak", "medium", "strong", "x-strong".
- <break time="200ms"/> - a pause for a specified time in milliseconds - suitable for longer pauses and dramatic pauses.
- <say-as interpret-as="ordinal">1</say-as> - says a number as an ordinal number: "first".
- <say-as interpret-as="characters">vut</say-as> - spells each letter separately. The same effect can be achieved without the tag by writing in capital letters: VUT or V.U.T.
- <say-as interpret-as="date" format="dmy">10-9-2021</say-as> - pronounces as the date "10th September 2021".
- <say-as interpret-as="time" format="hms">14:30:25</say-as> - pronounces as a time, i.e. "14 hours 30 minutes 25 seconds".
Of course, the spoken form can be tested directly on the virtual receptionist, but when testing a larger number of scenarios, it is quicker and more practical to use a free TTS testing service, such as the one offered by Google. It can be found at the following link.
htmlhttps://cloud.google.com/text-to-speech
The fact that there are special tags within the text that will be displayed in the text form is not a problem, as the virtual reception recognizes them and automatically hides them.
Exercise: Insert your text from the previous scenario into the TTS demo. Try to have it spoken and then try to add space tags at different points in the text and listen to how the pronunciation changes.
Exercise: Try working with other tags - numbers, characters, date, and time.
Tip: Despite all efforts, it may happen that some combination of words in a sentence leads to an unnatural pronunciation, for example due to an atypical connection of words, etc. In such a case, the simplest and fastest solution is to write the sentence slightly differently using different words.
Different Display and Pronunciation
In some cases, we need the displayed text to differ from the spoken text. This is the case for some names or other words where automatic pronunciation does not correspond to convention. An example is the name ARTIN, which is automatically pronounced softly, but the correct pronunciation is hard, that is, transcribed as "artynn". It is a similar principle to the notation of the pronunciation of English words, where the written form differs from the spoken form.
If we want a word to be written differently in text form and pronounced differently, we use square brackets and a vertical bar (on an English keyboard, it is usually the third key to the right of the letter L). The notation then looks like this.
javascript[displayed text|pronunciation], for example, [ARTIN|artynn].
We can also use this construction if we want to display some text without pronouncing it and vice versa.
javascript[this text will only be displayed, but nothing will be pronounced|].
javascript[|this text will only be pronounced, but nothing will be displayed].
This construction is not part of SSML, so when entered into the demo TTS, the system will try to read everything. The correct functionality of this notation can therefore only be tested directly on the virtual reception.
Tip: First, tune the sentence in the demo TTS in the form of pronunciation, and only then add a different written form using square brackets.
Special expressions in scenarios
Besides regular text, special expressions can also be used in scenarios. Typically, these are system or user contextual variables enclosed in a $ sign. The most common system variables are:
- $sys_date_time = date and time in the following format: Feb 2, 2021 14:42:22
- $sys_time = only time in the following format: 14:42:22
- $sys_month = month number in the following format: 2
- $sys_day_of_month = day number in the following format: 2
- $sys_day_of_week = day of the week number in the following format: 2
- $sys_12_hour_period = AM/PM flag in the following format: PM
- $sys_hour = current hour in the following format: 14
- $sys_minute = current minute in the following format: 42
- $sys_last_scenario = name of the last scenario in the format: Introduction scenario
- $terminal_sn = serial number of the terminal on which the current scenario is running (for differentiation if multiple terminals are using the same chatbot)
It is also possible to use special functions and keywords enclosed in curly braces {}, which can be directly entered into the text that the receptionist should say:
- {decline()} – example: decline($name, 4) – name declension
- {secondsfrom(timestamp)} – example: secondsfrom(1555683122.0) – number of seconds from the specified moment
- {date(locale, format)} – example: date(cs_CZ.utf8, %A %-d. %B) – date in the specified format
- {time} – current time in the format %H:%M
- {command=<USER_REQUEST>} – execution of a user request (see below) directly from the presented text, e.g. {command=EMAIL delivery Pavel Novak}
Expressions, functions, and keywords are continuously expanding with the development of the ARTIN Chatbot product.
Exercise: Try to create a scenario that displays and says the current date.
Special Characters in Scenarios
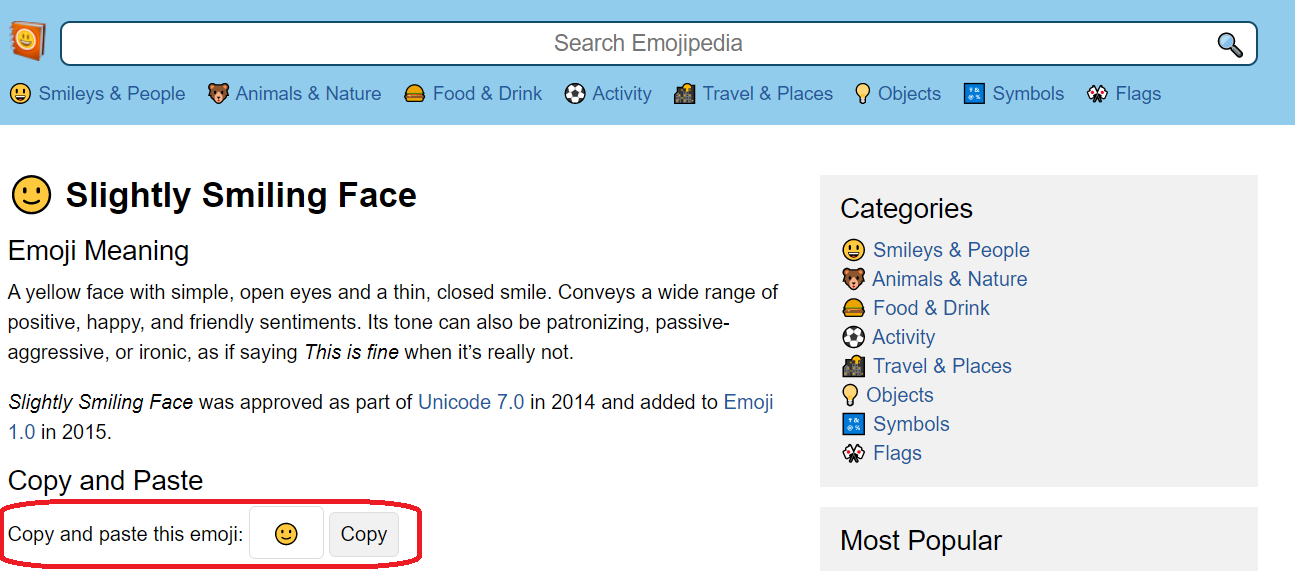
When creating scenarios, it is possible to use special graphical characters, also known as emoticons. They can be written in virtually any text, but they make sense either in the response or in navigation buttons. These special characters are available at the address:
htmlhttps://emojipedia.org/
On the Emojipedia website, it is possible to search for emojis by their English names and also easily copy them to the clipboard for simple insertion into the target text.
Exercise: Add a suitable emoticon to the text of the scenario.
Advanced Script Functions
In addition to simple text or voice responses, scripts offer a whole range of additional functions within the response. Not all of these functions are implemented for virtual receptionists, but most of them are. In the following chapters, we will discuss them.
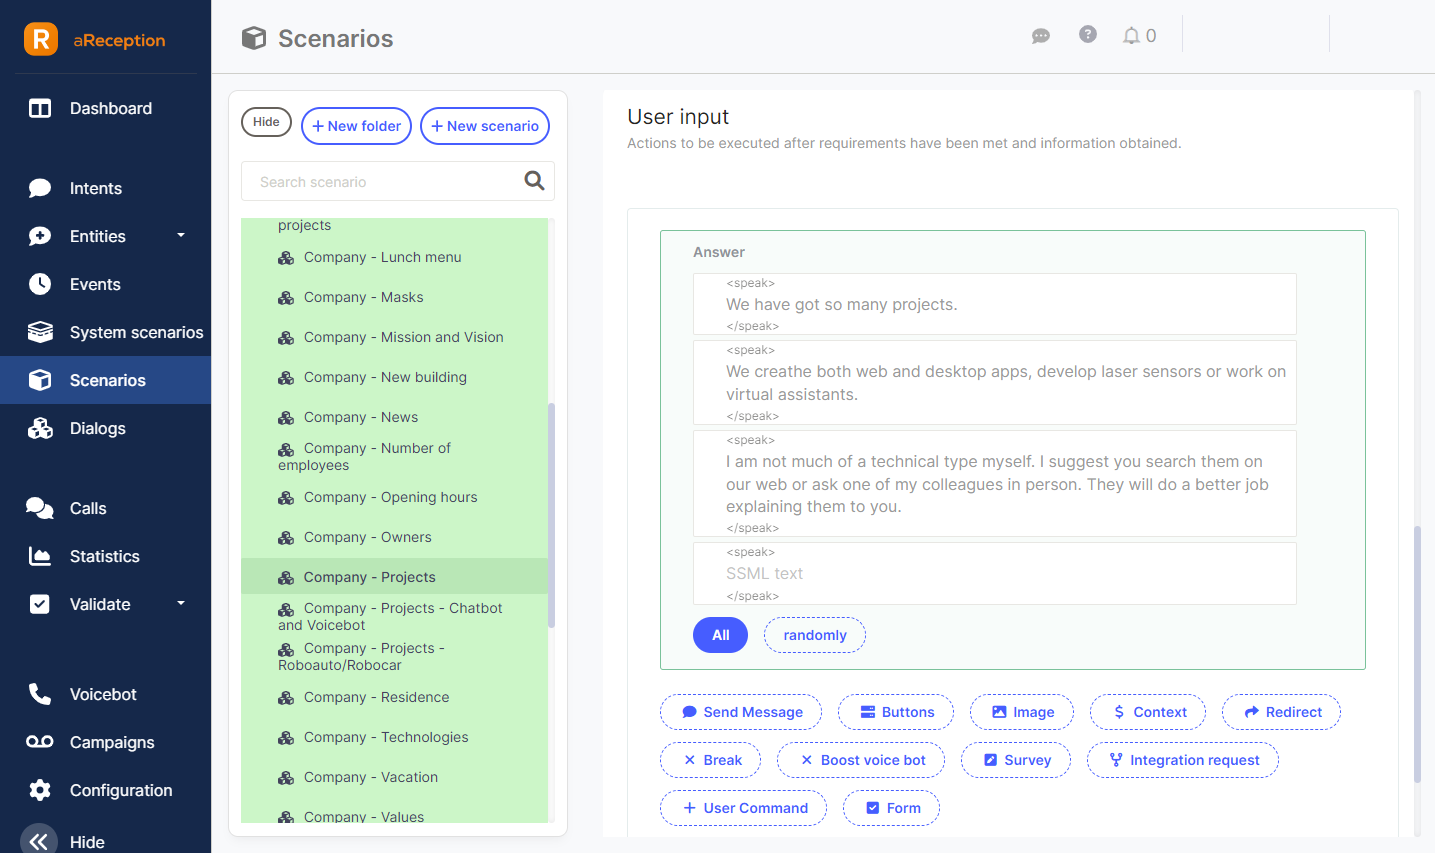
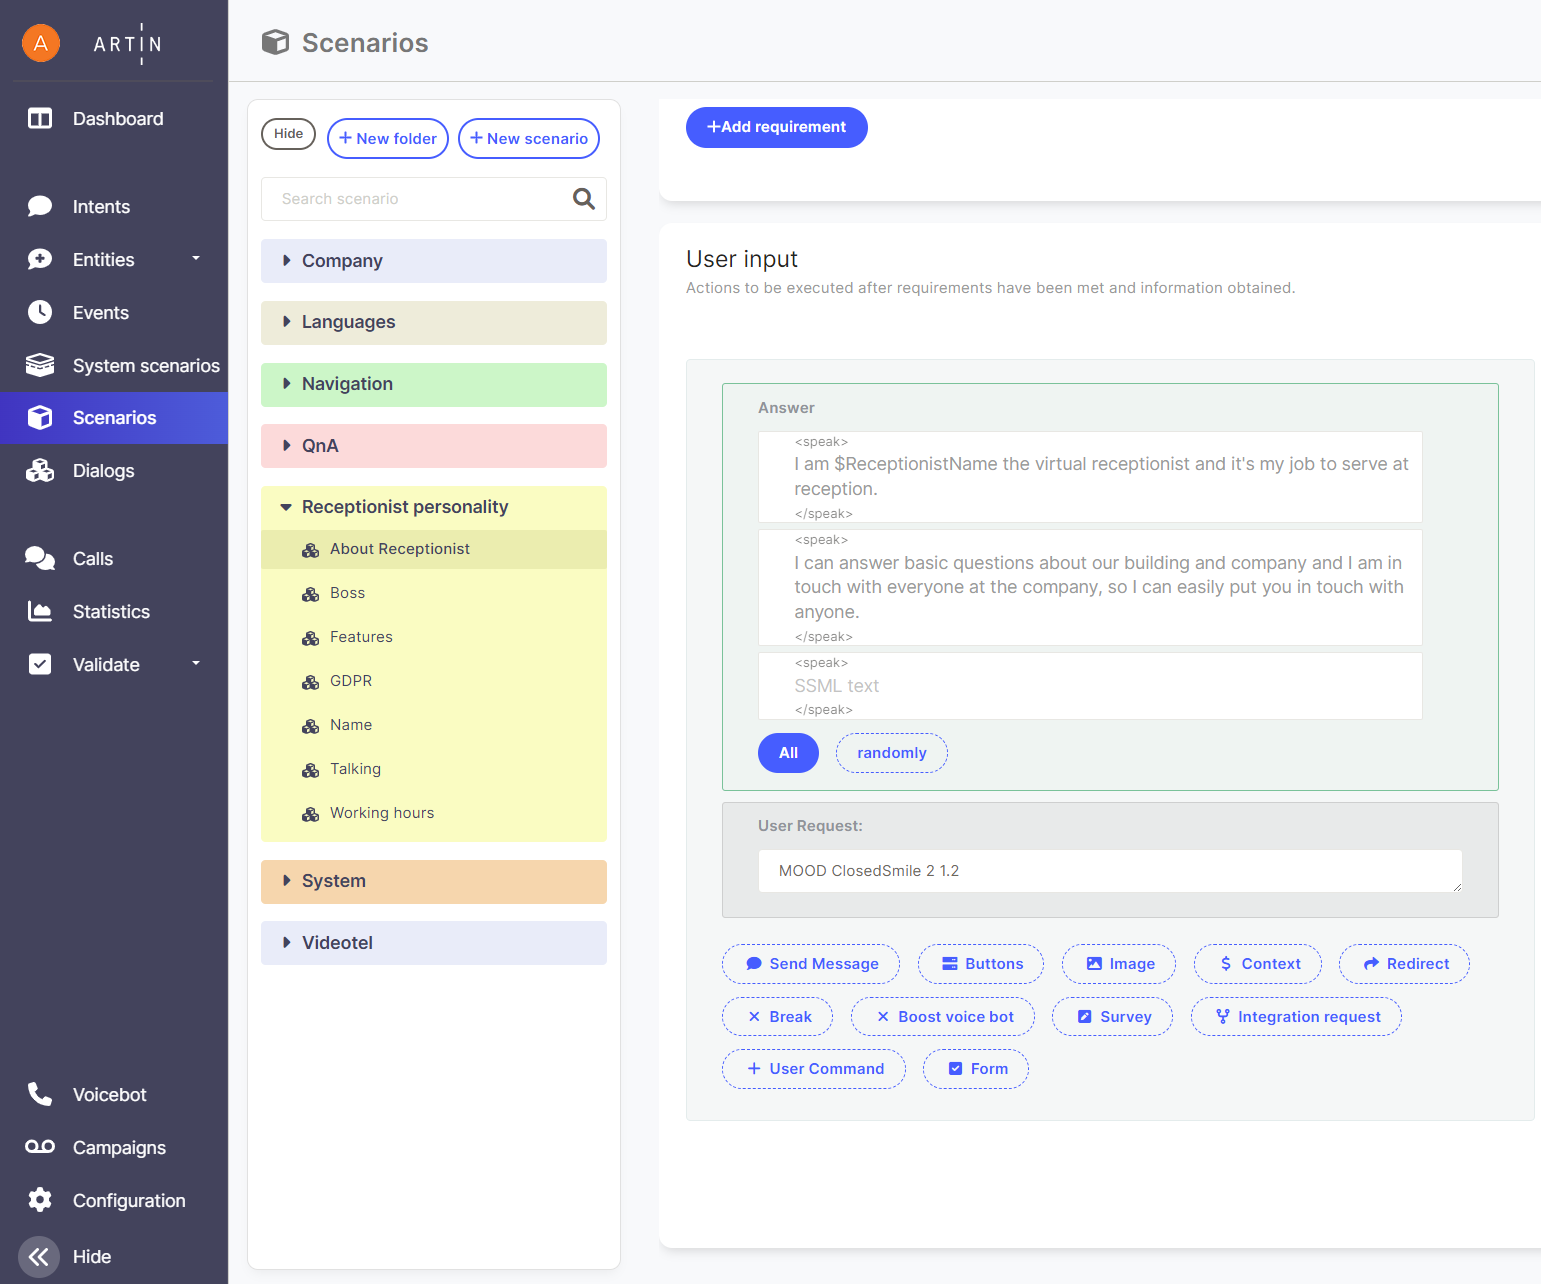
Multiple sentences and alternative responses
As a response, multiple sentences can be entered. Then it is possible to choose whether they should all be spoken "At once" or whether only "Randomly" one of them should be selected each time. Random selection can be used in cases where we need the response to not be identical every time - this creates a more natural conversation impression. The option of speaking all sentences is useful for longer texts that need to be divided into smaller units - there is then a significant pause between sentences. The same effect can be achieved by separating parts of a sentence using two <br /><br /> tags.
Exercise: Split the scenario into 2 sentences or complete one sentence. Test the behavior in the chat interface when choosing "All at once" and "Random" options.
Buttons
Buttons serve as an alternative quick option for frequently used features. They should also be used in cases where we want to design a virtual receptionist for use by the deaf.
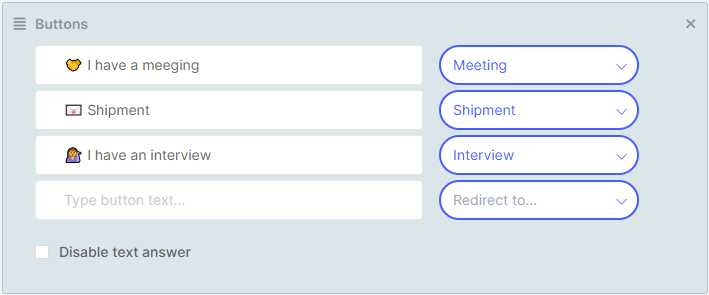
The button appears at the bottom of the touch panel after the virtual receptionist says the response text of the scenario, and works by triggering a specific new scenario selected from the options on the right side of the button label, without any further evaluation. There can be multiple buttons. If they don't fit within the panel width, they can be scrolled left or right by swiping with a finger.
The "Disable text response" option allows restricting inputs only to buttons, i.e. the user cannot continue using voice or text input. However, this option is generally not suitable for virtual receptionists, and is rather used in text-based chatbot applications.
Emojis can be used in the button label text just like in the response text of the scenario.
Exercise: Create a button with a suitable emoji icon for your scenario and redirect it to another scenario. Test it in the chat interface and on the virtual reception.
Context
The context section is used to set so-called context variables - that is, information that persists and is transferred between different scenarios. It can then be used, for example, to transfer information about a choice made in one scenario to another, especially when creating more advanced scenarios.
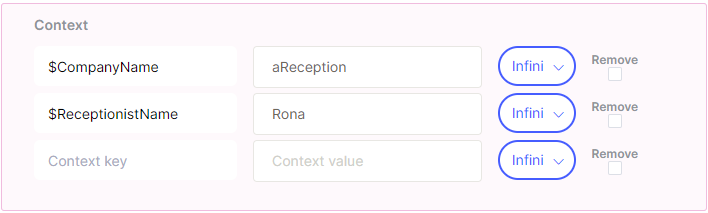
When entering, it is necessary to select the name of an existing context variable (also called "context key") or create a new one. It is also possible to insert a value into it and specify how long (over how many messages) the value will persist in the variable - the default value is indefinitely. The content of the variable can also be deleted so that it does not contain anything from that moment on.
There are also special context variables. For example, variables $fallback_question_1 and $fallback_question_2 are used to set a repeating question in case the user does not respond to the original question, stands still, and says nothing. For example, after the basic query "Please tell me who you want to call," these questions can be set to something like "Who should I call for you?" or "So who do you want to call?"
Exercise: Assign a value to the variable $name in one scenario and then print it in another scenario - just write the key $name in the text of the scenario.
Redirecting to Another Scenario
After completing a scenario, it is possible to automatically redirect to the execution of another scenario or dialogue.
Note: Dialogues are contextual "scenarios" that the user does not normally enter and are prepared for basic situations already in development.
It is possible to switch between dialogues and scenarios in the first optional box. The option that is currently NOT active is always highlighted, which can be a bit confusing.
It is also possible to choose an option where the scenario waits for the user's voice input before redirecting, and this input then becomes the input sentence for possible evaluation in the scenario/dialogue to which it is redirected

Exercise: Try redirecting from your scenario to another interface, such as a chat interface or a virtual reception.
User Requirement
The user requirement is the main tool for connecting the chatbot/virtual receptionist with each other and with the environment, as well as for its control. Typically, it is used for entering commands controlling:
- Receptionist's face
- Telephone services
- Video terminal
- Email interface
- Other services and devices connected within the integration of aReception for the customer
The user requirement is typically entered as a text command, which has its name and additional parameters.

The following user requests are now available for use in aReception (some may not be available depending on the configuration of the customer. For example, if VIDEOTEL or telephony is not in the configuration, then these user requests are not functional):
- VIDEOCONFERENCE - starts a video conference via VIDEOTEL
- CALL gradually - calls people from a pre-set list gradually (can be used as a backup option in case the user or back-office does not answer the phone)
- CALL <general | meeting | delivery | interview> <full name> - calls <full name> for a meeting | delivery | interview, for example: "CALL meeting Tomáš Ondráček"
- CALL {"type": "gradually | general | meeting | delivery | interview", "name": "value", "people2call": ["value1","value2"], "location": "value"} - JSON notation for the CALL command, allowing for an extended set of parameters (such as location or a list of contacts for gradual call).
- EMAIL delivery <full name> - sends an email about mail in the mailbox to reception for <full name>, for example: "EMAIL delivery Tomáš Ondráček" - email addresses must be available in the contacts list
- GET-CONTACT-INFO { "response-mapping": { "variable_name_without_dollar_prefix_1": "json_path_to_field_in_anwer_1", "variable_name_without_dollar_prefix_2": "json_path_to_field_in_anwer_2"}, “filter”:{"field_name": "filter_value_case_insensitive"}} - returns appropriate contact(s) from contact database from admin interface Return codes: "--GET-CONTACT-INFO-OK--” "--GET-CONTACT-INFO-ERROR--” Example: GET-CONTACT-INFO { "response-mapping": { "first_contact": "$.result[0].email", "all_contacts":"$.result"}, “filter”:{"phoneNumber": "778031466"}} Example of answer in JSON format with all field names: [{"id": 303, "note": "poznamka", "type": "zamestnanec", "email": "xxx@xxx.com", "office": "K125", "picture": "", "building": "D517", "idNumber": "123-987-AAD", "isActive": true, "language": "", "lastName": "Pavel", "location": "Ostrava", "firstName": "Jaroslav", "employment": "ekonom", "externalId": null, "phoneNumber": "+420111111111", "organizationUnit": "backoffice", "secondPhoneNumber": "+420999999999"}]
- END-CONVERSATION - ends the conversation (a conversation cannot be started for 10s - the person must have time to leave the camera)
- SOS - the user receives help (the same as when the question mark button is pressed in the bottom left corner)
- KEYBOARD <keyboard_type> - displays a keyboard for user touch input.
- KEYBOARD - displays a touch keyboard for selecting a name from a list of current contacts (the selected name is sent as a message, simulating keyboard input / representing speech).
- KEYBOARD contacts <text> - presets the <text> to the keyboard for name selection
- KEYBOARD general - displays a general keyboard for entering any text that is further processed as if the user had spoken it.
- SHOW-URL <url> - displays a window with a web page, the user can either close it themselves or it will automatically close when the user ends the conversation by leaving. The URL-CLOSED system intent is triggered when it is closed. The web page must be able to displayed in an iframe.
- SHOW-URL {"url": "http://example.org", "sandbox": "..."}
- the sendbox parameter is optional, if not specified or empty it is the most restrictive
- the allow-all value removes all restrictions
- individual restrictions can be overridden by the values described at https://www.w3schools.com/tags/att_iframe_sandbox.asp
- beware of allowing a link to appear in a new window that would overlay the avatar window
- TIP: most pages work well with the "sandbox": "allow-scripts allow-same-origin" setting.
- SHOW-IMAGE <url> - displays a window with an image loaded from the specified internet address, the user can either close it themselves or it will automatically close when the user ends the conversation by leaving. The IMAGE-CLOSED system intent is triggered when it is closed.
- READ-QRCODE <variable_name_without_$_sign> It will display an image from the camera's perspective and the user can point the camera at a QR code to load it. After reading the QR code, it is saved to a variable, the name of which is passed as a parameter of the command (without the initial $ character). Return values (to the chatbot): --QR-CODE-READ-- Successful QR code scanning --QR-CODE-CANCELLED-- User-initiated load interruption (cross in the top right) --QR-CODE-NOT-READ-- QR code reading timeout expired
- SWITCH-LANGUAGE <locale> - switches the language in which the receptionist communicates (this language must be in operation and therefore have the corresponding chatbot set up in that language - cs-CZ, en-US, etc.). Example: SWITCH-LANGUAGE en-US.
- WAIT <nnn> - waits for nnn milliseconds (e.g. WAIT 2000 waits for 2 seconds).
- WAIT-FOR-SPEECH-END - waits until the receptionist has finished speaking, then returns --SPEECH-FINISHED--. For example, if you want to display a web page (SHOW-URL) only after they finish speaking, otherwise it will display while they are speaking.
- ASK-CHATGPT <question> - submits a question to the artificial intelligence Chat GPT and displays its response. The parameter with the question can be obtained in the conversation by asking a question to the system entity @sys-input and saving it to a variable, which is then passed to the user request.
- INVOKE-CHATGPT-API <input> - calls the ChatGPT API and returns a response to the chatbot input. The response can then be retrieved in the @sys-input system entity. In case of an error, it will return --INVOKE-CHATGPT-API-ERROR--. An example follows:
jsonINVOKE-CHATGPT-API {
"model": "gpt-4o",
"messages": [
{
"role": "system",
"content": [
{
"type": "text",
"text": "If the user input contains a destination, place or location, return that destination. If not, return NONE."
}
]
},
{
"role": "user",
"content": [
{
"type": "text",
"text": "$last_user_question"
}
]
}
],
"temperature": 0,
"max_tokens": 256,
"top_p": 1,
"frequency_penalty": 0,
"presence_penalty": 0
}
- GET-GPT-INTENT <text> - Can be used as an alternative to the NLP in the chatbot. Intents are defined in the administration application in the "GPT intents" section. The recognized intent is returned to the chatbot input. It can then be retrieved in the system entity @sys-input.
- LOG <text> - when the user request LOG is called, the terminal does not perform any specific action. The <text> value is visible in the chatbot's conversation history.
- RECOGNIZE-FACE - the user request performs face recognition of the person standing in front of the camera and returns a value:
- --RECOGNIZE-SUCCESS-- if the face was recognized.
- --RECOGNIZE-FAILURE-- if the face was not recognized.
The name of the recognized person, including the uncertainty value, is returned in the context variable $fr_user.
- SET-CHATBOT-INPUT <text> - sends the specified <text> to the chatbot input as if the user had spoken it into the terminal.
- MOOD <expression> <duration> <amplitude> - sets the facial expression (<expression>) for <duration> seconds, with an intensity of <amplitude>
- <expression> - ClosedSmile, OpenSmile, Sad, Angry, Fear, Disgust, Surprise, Thinking, Blush, LeftWink, RightWink, Blink, Scream
- <duration> - time, a whole number, in seconds
- <amplitude> - amplitude of the expression - typically 0-1, but some expressions can be exaggerated to 1.2 (it's a lot about trying it out because different facial expressions require different amplitudes)
- example: "MOOD ClosedSmile 3 1.1" - a closed-mouth smile for 3 seconds with an intensity of 1.1
Exercise: Try adding various user requirements such as MOOD, SOS, or CALL to your script. See how they appear in the chat interface and on the virtual receptionist.
Calling HTTP or REST interfaces
To call a generic HTTP interface (including REST), you can use the HTTP-CALL user request. This request can call any HTTP interface with data (payload) in any text format (JSON, XML, ...), expects return values in JSON format, and maps them to selected context variables in the chatbot.
Given that the call and possible parameters are somewhat extensive, we present this user request in a separate subchapter. The general format of the user request is:
jsonHTTP-CALL <json-specification>
We have the following detailed format:
jsonHTTP-CALL {
  "method": <"POST"/“GET“/, …>
  "url": <"service-url">,
  "headers": {     <"header-key-1">: <"header-value-1">,
                   <"header-key-2">: <"header-value-2">,     …   },
  "payload": <“text-payload“>,
  "request-timeout-seconds": <time-in-seconds>,
  "return-chatbot-message": <message-to-send-to-chatbot-after-finishing-call>,
  "response-mapping": {
    <"context-var-for-resultCode">: "RESULT_CODE",
    <"context-var-for-resultMessage">: "RESULT_MESSAGE",
    <"context-var-1">: <"json-path-1">,
    <"context-var-2">: <"json-path-2">,     …
  }
}
Return message to chatbot:
After finishing the call to the HTTP service, the contextual variables in the chatbot will be mapped and then a return message defined by the string return-chatbot-message will be sent to the chatbot. This makes it possible to control the flow of further scenarios. Using this unique message, it is possible to create a follow-up scenario that will respond only to this specific message and display or otherwise use the results obtained by calling the HTTP service.
The format of this system message can of course be arbitrary, but it is good to follow a uniform format starting and ending with two dashes, with capital letters and individual words separated by a single dash - for example, --CARD-ISSUE-FINISHED--. The corresponding intent handling this message should then have an identical name, only without the starting and ending dashes, in this case: CARD-ISSUE-FINISHED.
Return codes:
In case of a successful call, the return code (RESULT_CODE) will be saved in the selected contextual variables and the return message (RESULT_MESSAGE) will be empty. At the same time, the selected values of the returned payload in JSON format are mapped to the appropriate contextual variables (which are only strings).
In case of an unsuccessful call or other problems, a return code of 900 or higher is returned and a result message corresponding to this return code is returned:
900 - general unspecified error (an exception occurred during the call), a detailed description of the exception is saved in RESULT_MESSAGE
901 - error parsing the response, probably not JSON
Example:
jsonHTTP-CALL { "method": "POST", "url": "https://8c5dae17-0b31-45f9-be49-c0263cd2b6f6.mock.pstmn.io/testpath?param1=val1¶m2=val2", "headers": { "Content-Type": "application/json", "X-auth": "kjnm45531" }, "payload": { "state": "idle", "data": { "welcome_message": "Dobrý den,", "messages": [ "msg1", "msg2", "msg3" ] } }, "request-timeout-seconds": 10, "return-chatbot-message": "—HTTP-CALL-FINISHED--", "response-mapping": { "resultCode": "**RESULT_CODE**", "resultMessage": "**RESULT_MESSAGE**", "contextParam1": "$.key", "contextParam2": "$.license.test" } }
Unused Advanced Script Features
Since Chatbot is a general product used for applications other than virtual receptionist aReception, not all features and possibilities are used or usable for virtual reception. These include, for example, Boost voicebot, Questionnaire, or Form. Colleagues from Chatbot and Voicebot projects can provide information on their use and other related services and products if interested.
Conclusion
The product aReception is constantly evolving and improving. If you have any ideas on how we can improve it, let us know.